Prevent Expensive Urgent Plumbing technician Calls: How to Repair Your Leaking Tap
Many property owners choose to neglect their dripping taps to prevent surprising costs. But 3 gallons of h2o daily can be lost because of those small dripping. It can also result to bigger problems that will cost more in the future. Leaking tap is one of the most common water system issues but also one of the easiest to fix. Knowing how to repair your dripping tap can save you from surprising plumbing technician calls and unexpected costs.
You should know that leaking taps are caused by either reduce nut products or appliance. You can differentiate a reduce nut if the h2o is dripping from the packaging nut area or somewhere around the base of its manage. Washer issues can be recognized when h2o is running out from the manage of your tap, there are dripping coming from the tap, or h2o is being gathered behind the tap manage.
Emergency plumber North York
Though there are various types of taps today, they still have the same areas and organized likewise. Here are the actions in solving your dripping tap.
Things You Need:
• Flexible wrench or a cres wrench
• Screwdriver
• Infiltrating oil
• Set of units with different sizes
You can also use pliers as alternative for a wrench.
Steps:
1. Convert the h2o turn off of your drain. If you do not have an individual turn off for your accessories, you have to use your main turn off to switch off the drinking h2o of your whole house.
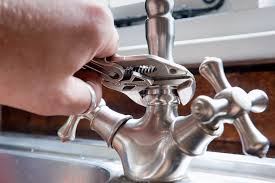
2. Eliminate the manage. You may want to take observe of its set up in case you have trouble in putting returning your drain. Eliminate the packaging nut by using your wrench or pliers. Packing nut is placed below or inside the tap manage. Avoid scarring damage the manage and packaging nut with your wrench.
3. Convert the control to the same direction that you would to create on the tap. Keep and shake it until you take away the whole device.
4. Locate the old appliance under the device. Eliminate the attach that keeps it in position. Use the penetrating oil to lubricant the attach if it is too tight.
5. Substitute the areas as necessary. Examine the attach and the control. You might need to restore these as well if it is already used out. Using your old appliance as your guide, examine for a perfect alternative from your set of new units. If you do not have a set at your home, bring your old appliance to a shop and ask a associate for its alternative. Take observe if the appliance is beveled or flat and create sure that your new one is identical to your old appliance. You might also want to restore it with a different one if your think that the appliance is not appropriate for the device.
6. Secure the new appliance in position and re-install the device in the tap. Position the control and grow it clockwise to put it returning again. Secure the packaging nut and manage with your wrench. Ensure that to prevent scarring damage any metal part as you reassemble the tap.
You may now switch on the drinking h2o and examine for dripping. If your tap is still dripping, you might need to call for utility employees or urgent plumbers to fix the problem as early as possible.
You should know that leaking taps are caused by either reduce nut products or appliance. You can differentiate a reduce nut if the h2o is dripping from the packaging nut area or somewhere around the base of its manage. Washer issues can be recognized when h2o is running out from the manage of your tap, there are dripping coming from the tap, or h2o is being gathered behind the tap manage.
Emergency plumber North York
Though there are various types of taps today, they still have the same areas and organized likewise. Here are the actions in solving your dripping tap.
Things You Need:
• Flexible wrench or a cres wrench
• Screwdriver
• Infiltrating oil
• Set of units with different sizes
You can also use pliers as alternative for a wrench.
Steps:
1. Convert the h2o turn off of your drain. If you do not have an individual turn off for your accessories, you have to use your main turn off to switch off the drinking h2o of your whole house.
2. Eliminate the manage. You may want to take observe of its set up in case you have trouble in putting returning your drain. Eliminate the packaging nut by using your wrench or pliers. Packing nut is placed below or inside the tap manage. Avoid scarring damage the manage and packaging nut with your wrench.
3. Convert the control to the same direction that you would to create on the tap. Keep and shake it until you take away the whole device.
4. Locate the old appliance under the device. Eliminate the attach that keeps it in position. Use the penetrating oil to lubricant the attach if it is too tight.
5. Substitute the areas as necessary. Examine the attach and the control. You might need to restore these as well if it is already used out. Using your old appliance as your guide, examine for a perfect alternative from your set of new units. If you do not have a set at your home, bring your old appliance to a shop and ask a associate for its alternative. Take observe if the appliance is beveled or flat and create sure that your new one is identical to your old appliance. You might also want to restore it with a different one if your think that the appliance is not appropriate for the device.
6. Secure the new appliance in position and re-install the device in the tap. Position the control and grow it clockwise to put it returning again. Secure the packaging nut and manage with your wrench. Ensure that to prevent scarring damage any metal part as you reassemble the tap.
You may now switch on the drinking h2o and examine for dripping. If your tap is still dripping, you might need to call for utility employees or urgent plumbers to fix the problem as early as possible.
